Data Hub Version 1 Export
A manual for Data Hub Export Version 1
- Site:
- Learning Spaces
- Course:
- Data Hub Version 1 Export Documentation
- Book:
- Data Hub Version 1 Export
- Printed by:
- Guest user
- Date:
- Friday, April 19, 2024, 1:37 PM
The documentation in this book is for using Data Hub Version 1 Export for Moodle 3.1, 3.2, or 3.3 and Totara 9.
What is Data Hub?
Data Hub is a general tool for importing and exporting user/course/enrollment information, either manually or automatically on a schedule, via CSV files. This is a common method for integrating SIS/HR/ERP/MIS systems with an LMS.
Data Hub Version 1 Export overview:
The LMS is a powerful system for delivering courses and assessing student progress, however it is common that users' grade data will need to be shared with other systems such as SIS, EPR, or HR systems.
To facilitate this, Remote Learner created Data Hub Version 1 Export, providing the capability to export incremental or historical course grades for users as standardized CSV files. Exports can be triggered manually or scheduled to run at recurring times. Detailed logs are kept of export jobs, which can be viewed online and/or emailed to designated recipients.
Data Hub does not include a set of SIS specific plug-ins; using Data Hub requires that external processes be in place to manage the delivery of the exported CSV files to the external systems SIS in a format that the external system can process.
Update Frequency
Exports can be scheduled to be processed at specific times/dates and on recurring schedules. Multiple schedules can be created to address a variety of export timing requirements.
Data format(s)
Data Hub produces data in CSV (comma separated values) files - a common format that can be easily viewed and/or edited in most spreadsheet management tools.
Automating Data Export
Data Hub can be scheduled to automatically process export files, placing in a specific folder on the LMS server. If an external source data system (SIS/ERP/HRMS, etc.) can be setup to automatically retrieve and process the files, an automated data flow can be established.
Accessing Data Hub Version 1 Export
Location
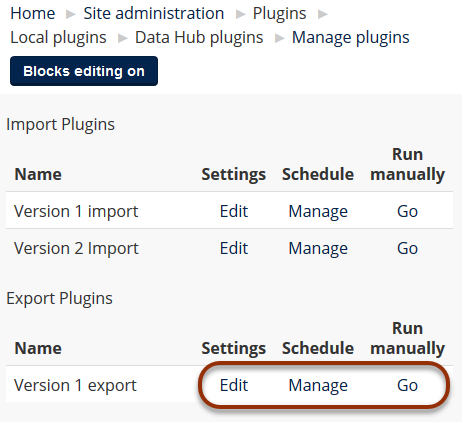
Data Hub Version 1 Export functions are located at Site Administration ► Plugins ► Local plugins ► Data Hub plugins ► Manage Plugins.
- Edit links to the Version 1 Export configuration page (also available through Site Administration ► Plugins ► Local plugins ► Data Hub plugins ► Version 1 Export).
- Manage links to the Schedule DH page for Version 1 Export where the scheduling of Data Hub export jobs takes place.
- Go links to the page for manual export file creation.
To edit field mappings for Version 1 Export navigate to Site Administration ► Plugins ► Local plugins ► Data Hub plugins ► Version 1 Export ► Field mapping.
Configuring Data Hub Version 1 Export
Location
To configure Data Hub Version 1 Export navigate to Site Administration ► Plugins ► Local plugins ► Data Hub plugins ► Version 1 Export.
Scheduled Export File Locations
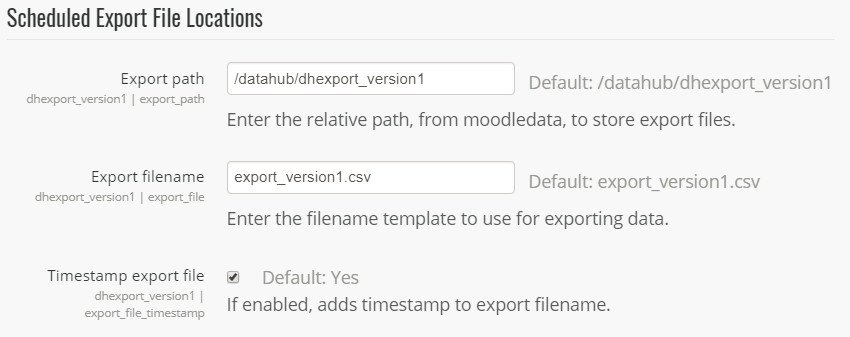
When running automated exports, Data Hub needs to know where to place export files on the server. This configuration section details that information.
- Export path: This field specifies the directory on the server, relative to the moodledata_prod folder, where the export file will be placed.
- Export filename: The specific name of the export CSV file that will be created.
- Timestamp export file: If this option is activated, Data Hub will append a timestamp to the export filename upon creation. This prevents previously created export files still on the server from being overwritten.
Logging
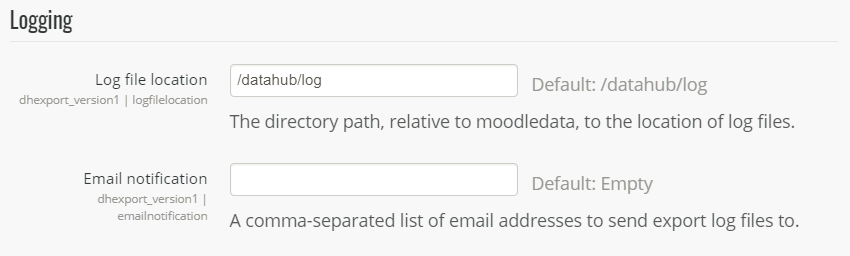
Data Hub generates detailed logs when it processes an export file, noting not only successes but also the root cause of any failures.
- Log file location: This field specifies the directory on the server, relative to the moodledata_prod folder, where the log files for the export processes will be placed.
- Email notification: This field accepts a comma separated list of email addresses to which export result logs will be sent after every scheduled export process.
Time Period Settings
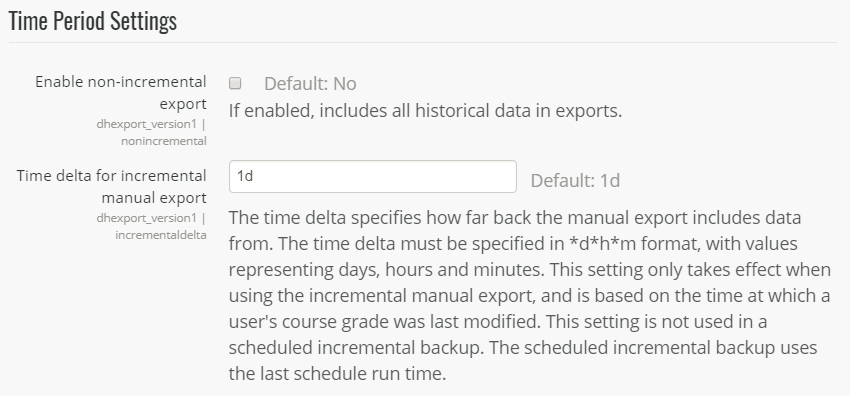
Data Hub imports offer the ability to export all historical course grade information, or to provide incremental course-grade information based on predefined time frames.
- Enable non-incremental export: If enabled, each export will contain all course grades for all users on the site. If disabled, an incremental export will be generated based on course grade changes since the last export was run.
- Time delta for incremental manual export: For manual exports, this field defines how far back Data Hub will look to gather course grade information.
Scheduling Data Hub Version 1 Export
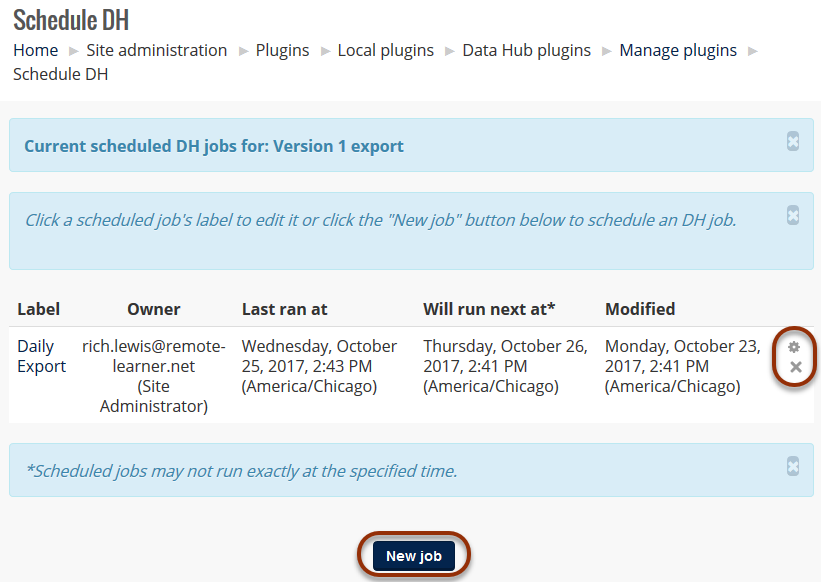
A scheduled Data Hub export process is called a job. Data Hub jobs define when the Data Hub automated export process will run.
Note that the running of a Data Hub job is constrained by the running of the LMS cron process. Therefore a Data Hub job won't necessarily run at the time specified, but rather at the next run of the LMS cron after the scheduled time for the job (typically within 5 or 10 minutes based on the run cycle of the LMS cron).
With that said, a job can be set to trigger at a predefined time, and ongoing on a recurring basis. Multiple jobs can be established to account for varying export processing needs.
Location
Data Hub jobs are displayed on the Schedule DH page accessed by navigating to Site administration ► Plugins ► Local plugins ► Data Hub plugins ► Manage plugins and selecting Manage link in the Schedule column for Version 1 Export.
To modify an existing job, select its name under the Label column, or select its Edit () action. Data Hub jobs may be deleted by selecting the job's Delete () action. To create a new job, select New job.
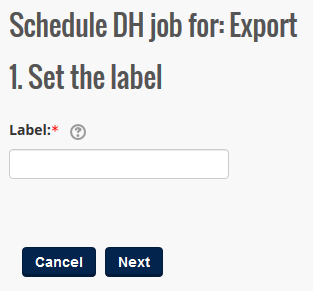
Creating a New Job
To create a new scheduled job, select New job on the Schedule DH page. This presents step "1. Set the label".
- Label: The field that will define the name of the new Data Hub scheduling job.
Selecting Next moves to the next step of the Data Hub job creation process, "2. Set when it runs". The resulting screen provides options for either Basic Period Scheduling or Advanced Scheduling.
Basic Period Scheduling
Basic Period Scheduling defines a single time interval that guarantees the job runs one time each time interval.
- Period: Defines a time interval in terms of days, hours, and/or minutes in the format "xdxhxm". Not every time unit needs to be entered. For example, if "5d" is entered, the job would run every five days.
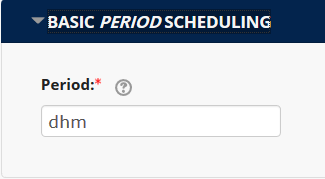
Select Next at the bottom of the page to complete the job creation process. The new job will display in the job list on the Schedule DH page.
Advanced Scheduling
Advanced scheduling allows for finer control over the initiation time and recurrence of job executions.
- Timezone: Defines the timezone that will be used when setting clock times for the remaining advanced scheduling fields.
- Start: Defines the first time the job will run. Options include "Now" so that the process will run at the first cron execution after the job schedule is saved, or "On" a specific date and time.
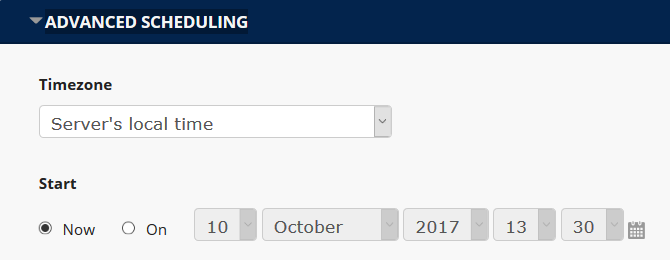
- Recurrence: Defines the frequency at which the job will run. There are two options - "Simple" and "Calendar" - each of which presents different configuration choices.
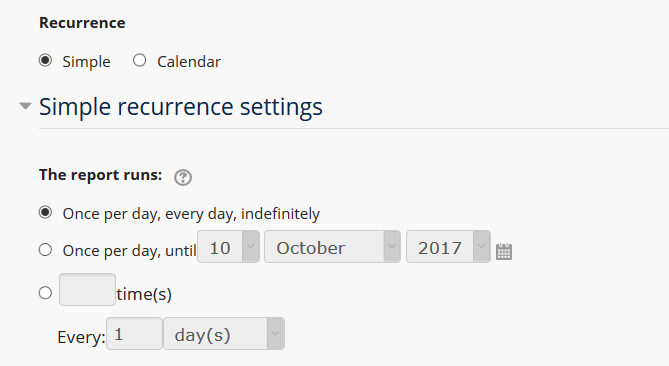
Simple
- The report runs: offers three choices.
- "Once per day, every day, indefinitely".
- "Once per day, until" allows for the setting of an end date.
- A specific number of "time(s)" every indicated number of "minutes", "hours", "days", or "weeks".
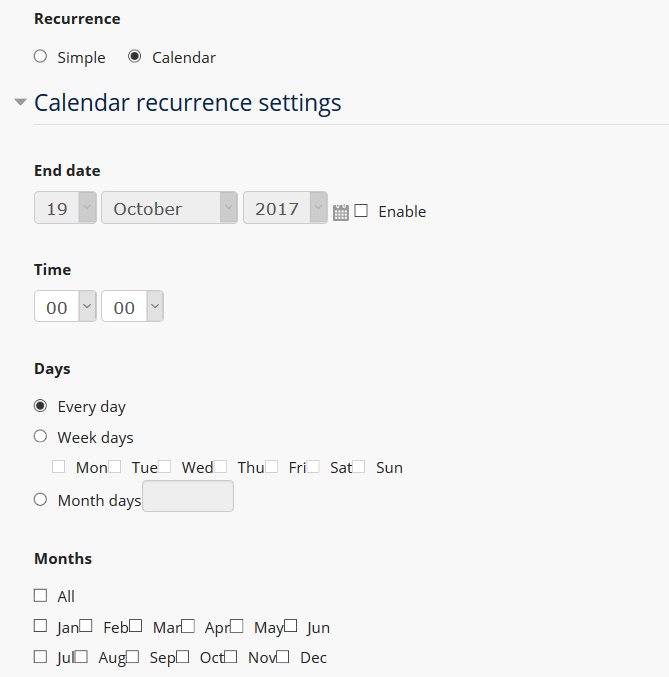
Calendar
- End date: If enabled, this specifies the date on which the job will no longer run.
- Time: Specifies the clock time of the day that the job will run upon the next cron run.
- Days: Allows for the identification of specific days of the week or month on which the job will run. Options include:
- "Every day"
- "Weekdays" followed by the identification of specific days of the week.
- "Month days" with a field where specific dates of the month can be identified.
- Months: Allows for the identification of "All" or specific months of the year in which the job will run.
Select Next at the bottom of the page to complete the job creation process. The new job will display in the job list on the Schedule DH page.
Export File Structure
The following is an example of a standard Data Hub export file.

The column headers identify the user, course, and grade information that is produced for the export CSV file. Each item is listed below with a brief description:
|
Field/Property |
Purpose/Values |
| First name |
The user's first name. |
| Last name |
The user's last name. |
| Username |
The LMS username for the user. |
| User Idnumber |
The ID number associated with the user account. |
| Course Idnumber |
The short name of the course in which the user is enrolled and for which the course grade is being reported. |
| Start Date |
The start date for the course as defined in the course settings. |
| End Date |
The end date for the course as defined in the course settings. |
| Grade | The current overall course grade that the user has earned for the cited course. |
| Letter | The letter grade equivalent for the current overall course grade that the user has earned for the cited course. |
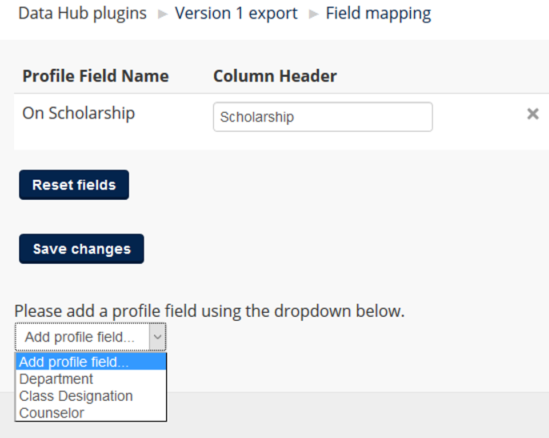
Including Custom Profile Fields
Custom profile fields can be included in Data Hub export files.
Location
The Site Administration ► Plugins ► Local plugins ► Data Hub plugins ► Version 1 export ► Field mapping page contains the mechanism to add custom profile fields to the export file.
All custom profile fields already declared on the site will be available to select from the Add profile field drop-down menu. Once a field is selected, it will be displayed in the table with the field name under the Profile Field Name column.
After being added, it is possible to change the name of the custom profile field for the export. Enter a new name if desired for the associated custom profile field in the Column Header field and select Save changes to commit the changes to the server.
The following is an example of an export CSV file containing the custom profile field Scholarship.

Manual Import
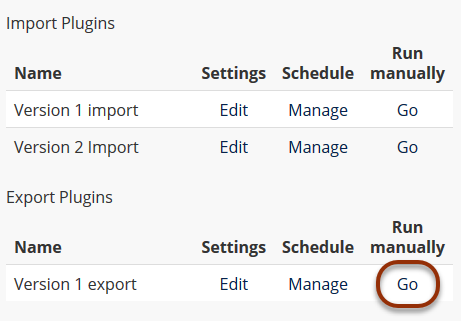
Site administrators can manually trigger the Data Hub export process.
Location
Navigate to Site administration ► Plugins ► Local plugins ► Data Hub plugins ► Manage plugins and select Go in the Run manually column.
The resulting page has a single function. Select the Run Now button to begin the Data Hub export process. Doing so will create an export file while can be saved to the local computer and opened normally.
Viewing Logs
Data Hub logs for all import and export processes are available at Site Administration ► Reports ► Data Hub logs.
The log viewing screen provides the ability to filter the displayed logs, to view summary information about success and failure of import and exports, and the ability to download and view the full logs.
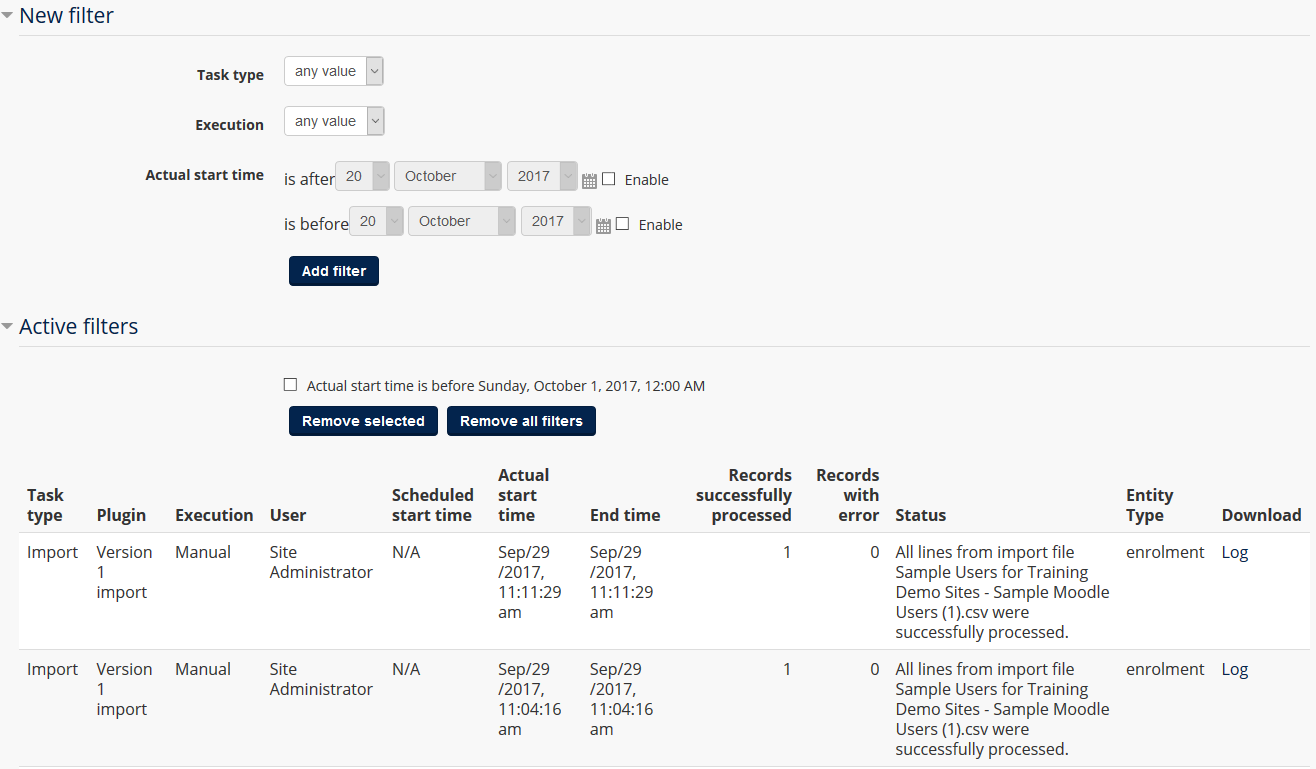
New Filters
The filter settings will hide or show logs with certain parameters.
- The Task type can filter only "Import" or only "Export" logs.
- The Execution can filter "Automatic" imports only or "Manual" imports only.
- The Actual start time can filter logs for actions that occurred on specific dates.
Active Filters
Active filters will display what filters are currently being used to filter the logs. This is followed by the list of filtered log files.
Filter |
Description |
| Task | type of task - Import or Export |
| Plugin | specific Data Hub plugin used |
| Execution | how file was run - automatically or manually |
| User | which user ran the file |
| Scheduled start time | time the file was scheduled to run |
| Actual start time | time the file started processing |
| End time | time the file completed processing |
| Records successfully processed | number of records that were processed successfully |
| Records with errors | number of records with errors and could not be processed |
| Status | summary of the Data Hub run |
| Entity type | what kind of file was run - user, course, enrollment, etc. |
| Download | includes a Log link to download the full log file if available. Since export files just export completion information, there is no detailed log of these files. |
Using a Dedicated Data Hub Cron
The LMS relies on a timed procedure, know as a cron process, to run many recurring tasks such as sending notifications of forum subscription updates, running reports, and updating course and activity completions. By default, Data Hub also uses the LMS cron to process import and export files. When these export files become extremely large (such as when performing a non-incremental export) they may take too long to run, causing other operations to fail to run.
To address this issue it is possible to establish a separate system-level cron process dedicated to triggering Data Hub processes by itself which will not impact the LMS cron from running regularly.
To pursue this solution, Remote Learner support must assist in the establishment of the new system-level cron process dedicated to Data Hub.
Once Remote Learner establishes the process, disable the Data Hub plugin from running in the LMS cron. This will remove the triggering of Data Hub from the LMS cron.
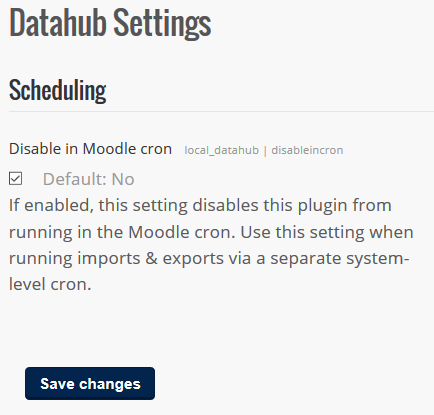
Location
Navigate to Site Administration ► Plugins ► Local plugins ► Data Hub Settings and activating the Disable in Moodle cron option.