- Data Hub Overview
- New Data Hub Features
- Accessing Data Hub for Moodle 2
- Data Hub Configuration
- Importing/Processing Files
- Viewing Logs
- Accessing the Import, Export, and Log Folders Via SFTP
- Setting Up User Import Files
- Importing Course Information
- Importing Enrollment Information
- Exporting Grade Information from Moodle via DH
- Importing very large user and enrollment files:
- Automating Data Hub
- Full list of actions and required fields for each
Data Hub 2.0
Exporting Grade Information from Moodle via DH
Data Hub can export final grade information (number and/or letter grades) in csv format. This can be imported to an SIS/ERP record keeping program (Banner, Peoplesoft, SAP, etc.). What is provided by Data Hub is a regularly exported csv file with either incremental data (grades changed/updated since the previous export) or a full export of all grade data on the system. Custom user profile fields can be added to this export.
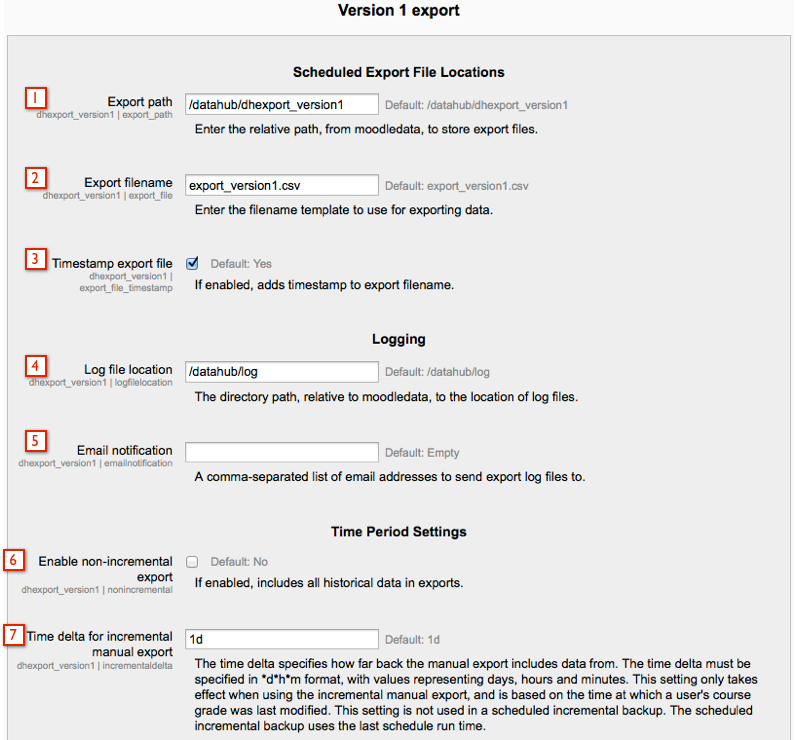
Access export settings by going to the Administration block > Site Administration > Plugins > Local plugins > Data Hub plugins > Version 1 export. The screen in the following image will be shown.
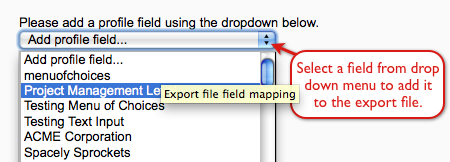
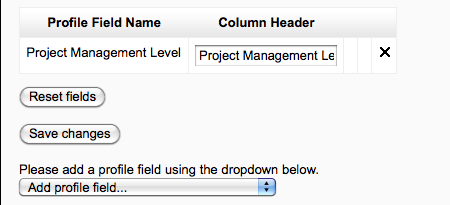
The Project Management Level profile field has now been added to the export file. The column header for the custom profile field in the export file can be edited once the profile field has been added.
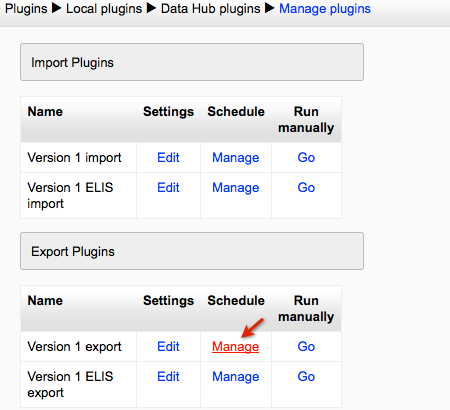
Export files can be run manually or can be scheduled to run automatically. To schedule an export to automatically run go to the Administration block > Site Administration > Plugins > Local plugins > Data Hub plugins > Manage plugins. Under the Export Plugins section select the "Manage" link under the Schedule column.
Then select the "New Job" button.

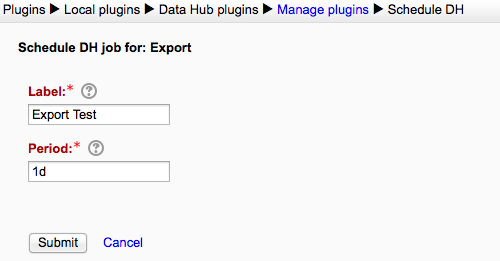
Enter the Label and Period for the job. The example in the next image has the period set for one day. So this export will run one day from the time this job is created and then it will run once every day at about the same time. If you only want the scheduled job to run once it needs to be deleted after it has run.
There are new scheduling features for Data Hub 2.7.7.0+ and 2.8.5.0+. Data Hub now has an advanced scheduling option.
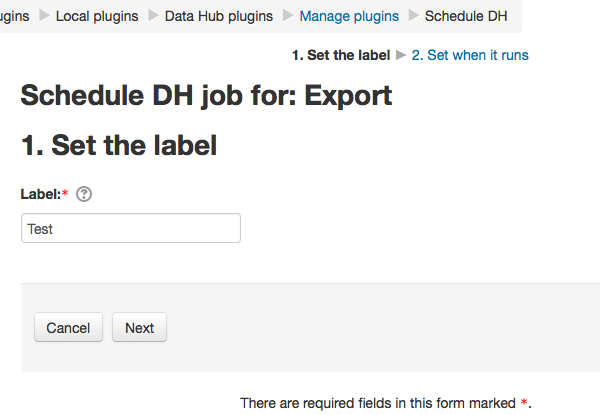
There are two steps to schedule a Data Hub job with the new improvements. The first step is to enter a Label for the job.
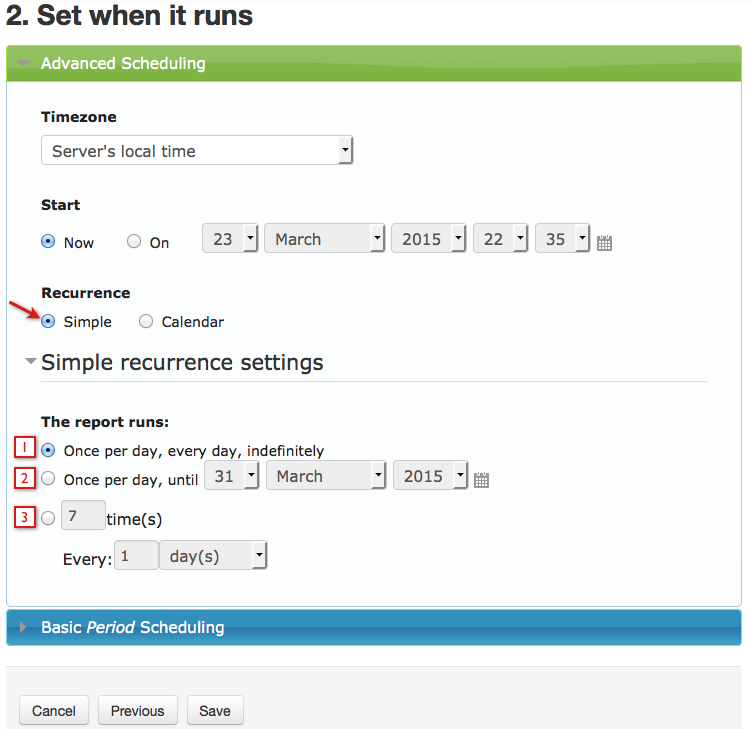
Step 2 sets when the job runs. There are two options, advanced scheduling and basic period scheduling. Basic period scheduling is the type of scheduling used in ELIS versions prior to 2.7.7.0 and 2.8.5.0. Advanced scheduling is the new feature shown below.
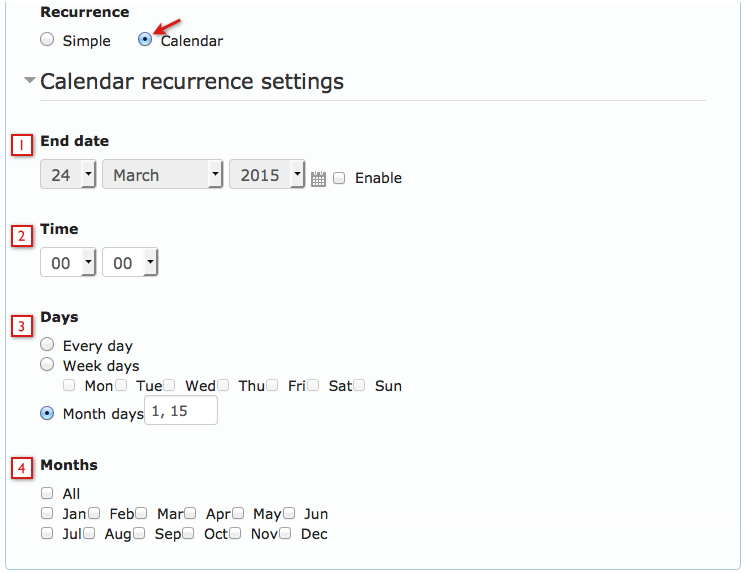
There are two types of recurrence settings for advanced scheduling, simple and calendar. Select which one you will be using as shown in the next image. Each recurrence has different settings, so the settings will change depending on which recurrence you select.
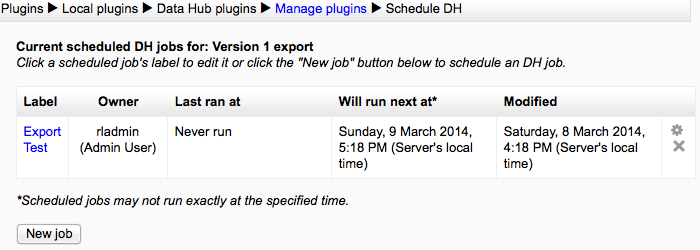
Files from scheduled exports are saved in the Export path, which is displayed in the Administration block > Site Administration > Plugins > Local plugins > Data Hub plugins > Version 1 export link. The following image is showing scheduled jobs.
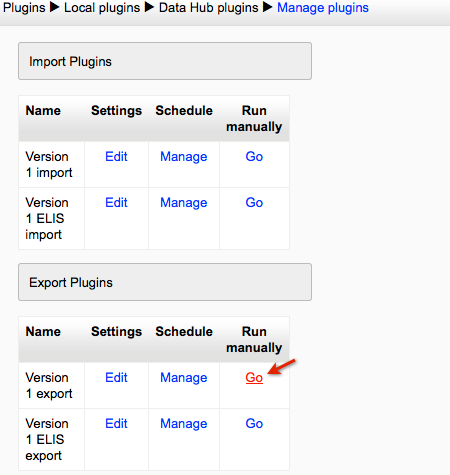
To run a export file manually go to the Administration block > Site Administration > Plugins > Local plugins > Data Hub plugins > Manage Plugins. Under the Export Plugins section select the "Go" link in the Run manually column.
Then select the Run Now button. The file will be presented for download. If the file takes to long to run then the file will be saved in the Export path (displayed on the Version 1 export settings screen).
The following image shows an example of an export file.

This file is displaying completion information for users that have completed a course within the last day. If a user is in multiple courses, each course will have a separate row in the file.
The end date for users in the export will be the date the export is run.
Access export settings by going to the Administration block > Site Administration > Plugins > Local plugins > Data Hub plugins > Version 1 export. The screen in the following image will be shown.

- Export path - Enter the path to store export files.
- Export filename - Enter the filename for export files.
- Timestamp export file - Adds timestamp to export file name.
- Log file location - Location of the log file. New locations can be created by adding a new path, when the export runs the new path will be created.
- Email notification - Enter the email of users that should receive the export log file by email.
- Enable non-incremental export - This is used for scheduled exports. Enable this feature to include all data for users. Disable this feature to include all data for users since the last scheduled export.
- Time delta for incremental manual export - This setting is used for manual exports.
- first name
- last name
- username
- user idnumber
- course idnumber
- start date
- end date
- grade
- letter grade

The Project Management Level profile field has now been added to the export file. The column header for the custom profile field in the export file can be edited once the profile field has been added.

Export files can be run manually or can be scheduled to run automatically. To schedule an export to automatically run go to the Administration block > Site Administration > Plugins > Local plugins > Data Hub plugins > Manage plugins. Under the Export Plugins section select the "Manage" link under the Schedule column.

Then select the "New Job" button.

Enter the Label and Period for the job. The example in the next image has the period set for one day. So this export will run one day from the time this job is created and then it will run once every day at about the same time. If you only want the scheduled job to run once it needs to be deleted after it has run.

There are new scheduling features for Data Hub 2.7.7.0+ and 2.8.5.0+. Data Hub now has an advanced scheduling option.
There are two steps to schedule a Data Hub job with the new improvements. The first step is to enter a Label for the job.

Step 2 sets when the job runs. There are two options, advanced scheduling and basic period scheduling. Basic period scheduling is the type of scheduling used in ELIS versions prior to 2.7.7.0 and 2.8.5.0. Advanced scheduling is the new feature shown below.
There are two types of recurrence settings for advanced scheduling, simple and calendar. Select which one you will be using as shown in the next image. Each recurrence has different settings, so the settings will change depending on which recurrence you select.

- Select this to run the report once a day indefinitely.
- Select this to run the report once a day until the date selected.
- Select this to run the report a certain number of times at one of four intervals - minutes, hours, days, or months. In the example shown in the image above this setting will run the report once a day for 7 days.

- End date: Select the date when the report should stop running. Select the Enable checkbox to enter an end date.
- Time: Use the drop downs to enter the time. The hours drop down uses a 24 hour format. For example, 16:55 is 04:55 PM.
- Days: select whether the report runs every day, only on specific week days, or specific month days.
- If week days is selected, select which days.
- If Month days is selected, enter a number for the day of the month the report should run. For example, 15 for the 15th.. If the report should run on more than one month day, enter day numbers separated by commas.
- Months: Select the months in which the report runs. For example, if the report is scheduled to run on January and July only, and the Month days is set to 15, then it runs on January 15 and July 15. If the report was set to run every Friday (in the Week Days) then it would run every Friday in July and January.
Files from scheduled exports are saved in the Export path, which is displayed in the Administration block > Site Administration > Plugins > Local plugins > Data Hub plugins > Version 1 export link. The following image is showing scheduled jobs.

To run a export file manually go to the Administration block > Site Administration > Plugins > Local plugins > Data Hub plugins > Manage Plugins. Under the Export Plugins section select the "Go" link in the Run manually column.

Then select the Run Now button. The file will be presented for download. If the file takes to long to run then the file will be saved in the Export path (displayed on the Version 1 export settings screen).
The following image shows an example of an export file.

This file is displaying completion information for users that have completed a course within the last day. If a user is in multiple courses, each course will have a separate row in the file.
The end date for users in the export will be the date the export is run.