- Data Hub Overview
- New Data Hub Features
- Accessing Data Hub for Moodle 2
- Data Hub Configuration
- Importing/Processing Files
- Viewing Logs
- Accessing the Import, Export, and Log Folders Via SFTP
- Setting Up User Import Files
- Importing Course Information
- Importing Enrollment Information
- Assigning Users to Groups
- Assigning Parent Roles
- Exporting Grade Information from Moodle via DH
- Importing very large user and enrollment files:
- Automating Data Hub
- Full list of actions and required fields for each
Data Hub 2.0
Importing Enrollment Information
Assigning Parent Roles
This use case will demonstrate how to:
To create the parent role go to the Site Administration > Users > Permissions > Define roles. Go to the the bottom of the page and select the 'Add a new role' button. There are 5 permissions that will be allowed for this Parent role:
There are 5 required fields to create the CSV file to assign parent roles to users via Data Hub:

The users in this example have already been added to the site. If users have not been added to the site, add the users via a user file or other methods first.
Any of the properties included on the Version 1 import > Field mapping > Enrollment fields tab can be included in the CSV file.
Once the file has been created it can be uploaded and processed. To upload and process the file go to the Administration block > Site Administration > Plugins > Local plugins > Data Hub plugins > Manage plugins. The image in the following screen will open. Under the Import Plugins section select the "Go" link in the Run manually column.

Choose an (3) enrollment file to upload. Then select the Run Now button at the bottom of the page.

A brief log message will be displayed about the success of the file that was processed.
The new role can be located by going to the student user's profile screen. Then go to the Administration block > Profile settings for Connors Melanie > Roles > Assign roles relative to this user.

That will open a page where we can see the role assignment we created will the Integration point file.

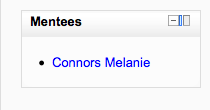
To demonstrate how the role is used I'll login as the user that was just assigned to the parent role. The user will see the the student user they were assigned the parent role for in the Mentees block.
If the parent user selects the student user's name from the Mentees block, they will be linked to the student user's profile screen. From here the parent user can access the features they have permissions to use.

The courses the student user is assigned to can be linked to here from the Course profiles section of the user profile, each course name is a link to the course. The parent user does not have full access to the courses though, just the features they have permissions to use.
- Create a parent role
- Create/upload a CSV file via Data Hub to add users to the parent role of students
- Use the new parent role
Creating the Parent Role
To create the parent role go to the Site Administration > Users > Permissions > Define roles. Go to the the bottom of the page and select the 'Add a new role' button. There are 5 permissions that will be allowed for this Parent role:
- Users
- Edit user profile - moodle/user:editprofile
- See all user blogs - moodle/user:readuserblogs
- See all user posts - moodle/user:readuserposts
- See user activity reports - moodle/user:viewuseractivityreports
- Course
- View user profile - moodel/user:viewdetails
Creating/Uploading the CSV file
There are 5 required fields to create the CSV file to assign parent roles to users via Data Hub:
- action: add this user to the following role in the following
- context: this user will be assigned a role in the user context
- instance: in this example the instance is the student user, enter the username
- username: enter the username of the user receiving the new role permissions
- role: enter the shortname of the role being assigned
The users in this example have already been added to the site. If users have not been added to the site, add the users via a user file or other methods first.
Any of the properties included on the Version 1 import > Field mapping > Enrollment fields tab can be included in the CSV file.
Once the file has been created it can be uploaded and processed. To upload and process the file go to the Administration block > Site Administration > Plugins > Local plugins > Data Hub plugins > Manage plugins. The image in the following screen will open. Under the Import Plugins section select the "Go" link in the Run manually column.
Choose an (3) enrollment file to upload. Then select the Run Now button at the bottom of the page.
A brief log message will be displayed about the success of the file that was processed.
The new role can be located by going to the student user's profile screen. Then go to the Administration block > Profile settings for Connors Melanie > Roles > Assign roles relative to this user.
That will open a page where we can see the role assignment we created will the Integration point file.
Using the Role
To demonstrate how the role is used I'll login as the user that was just assigned to the parent role. The user will see the the student user they were assigned the parent role for in the Mentees block.
If the parent user selects the student user's name from the Mentees block, they will be linked to the student user's profile screen. From here the parent user can access the features they have permissions to use.
The courses the student user is assigned to can be linked to here from the Course profiles section of the user profile, each course name is a link to the course. The parent user does not have full access to the courses though, just the features they have permissions to use.