- Data Hub Overview
- New Data Hub Features
- Accessing Data Hub for Moodle 2
- Data Hub Configuration
- Importing/Processing Files
- Viewing Logs
- Accessing the Import, Export, and Log Folders Via SFTP
- Setting Up User Import Files
- Importing Course Information
- Importing Enrollment Information
- Exporting Grade Information from Moodle via DH
- Importing very large user and enrollment files:
- Automating Data Hub
- Full list of actions and required fields for each
Data Hub 2.0
Importing/Processing Files
Scheduling Import Times
Scheduled imports process files uploaded to the the import files path, which is also referred to as the import file location in some areas of the documentation. The files can be uploaded to the import files path via SFTP. The import files path is listed in the Administration block > Site Administration > Plugins > Local plugins > Data Hub plugins > Version 1 import settings.
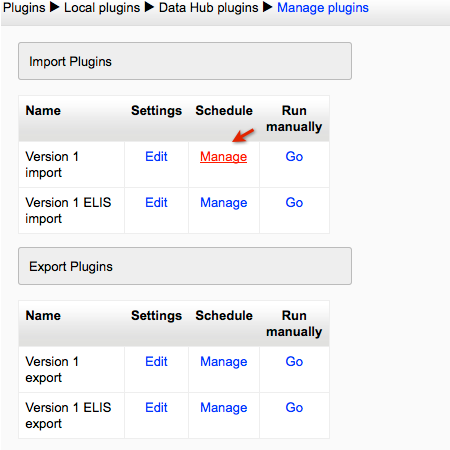
To schedule your imports, click the Manage link under the Schedule heading.
This will open up the scheduling wizard. Click the New job button to create a new job. A single site can run more than one scheduled import/export job.
The schedule defines the earliest time a job can run, but the jobs themselves may run a few minutes later than the scheduled times.
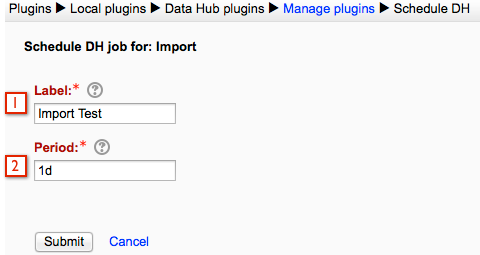
- First we'll need to give our job a label - this lets us tell what the different jobs we have scheduled do, so it's ideal to use a label that will make it easy for you to tell what the job is for.
- Period - this is the frequency the job will run. Import date format: The are 3 import date formats, whichever format is selected here must be used in the import files. This value should be set in the format *d*h*m with 1d = once per day. 1 h= once per hour, and 5m = every 5 minutes. For example, you set your schedule to 2d the this job would run every two days from the time you set the schedule up. If you set it at 2h, then the job would run every two hours from the time you set the schedule up. If you set it to 30m, the import will run every 30 minutes starting from the time you set the schedule up.
There are new scheduling features for Data Hub 2.7.7.0+ and 2.8.5.0+. Data Hub now has an advanced scheduling option.
There are two steps to schedule a Data Hub job with the new improvements. The first step is to enter a Label for the job.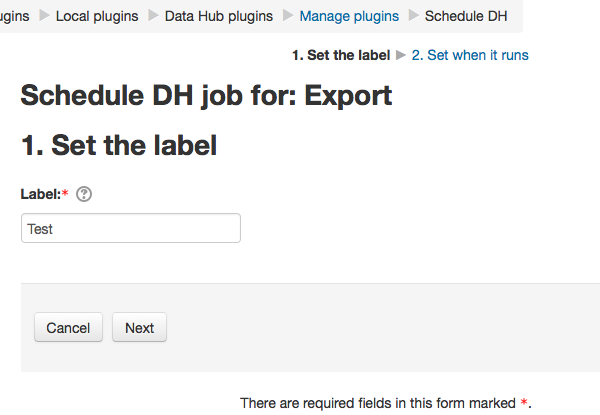
Step 2 sets when the job runs. There are two options, advanced scheduling and basic period scheduling. Basic period scheduling is the type of scheduling used in Data Hub versions prior to 2.7.7.0 and 2.8.5.0. Advanced scheduling is the new feature shown below.
There are two types of recurrence settings for advanced scheduling, simple and calendar. Select which one you will be using as shown in the next image. Each recurrence has different settings, so the settings will change depending on which recurrence you select.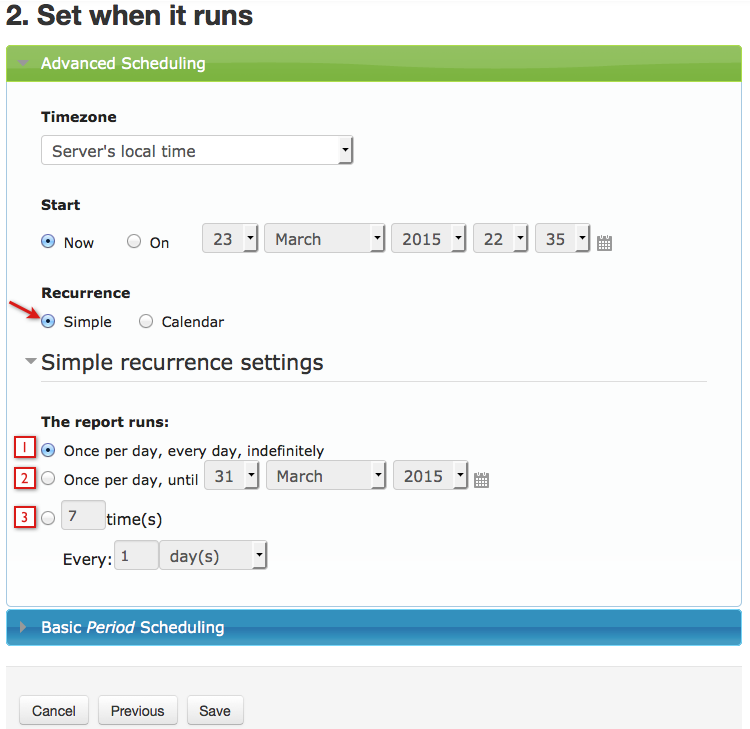
- Select this to run the report once a day indefinitely.
- Select this to run the report once a day until the date selected.
- Select this to run the report a certain number of times at one of four intervals - minutes, hours, days, or months. In the example shown in the image above this setting will run the report once a day for 7 days.
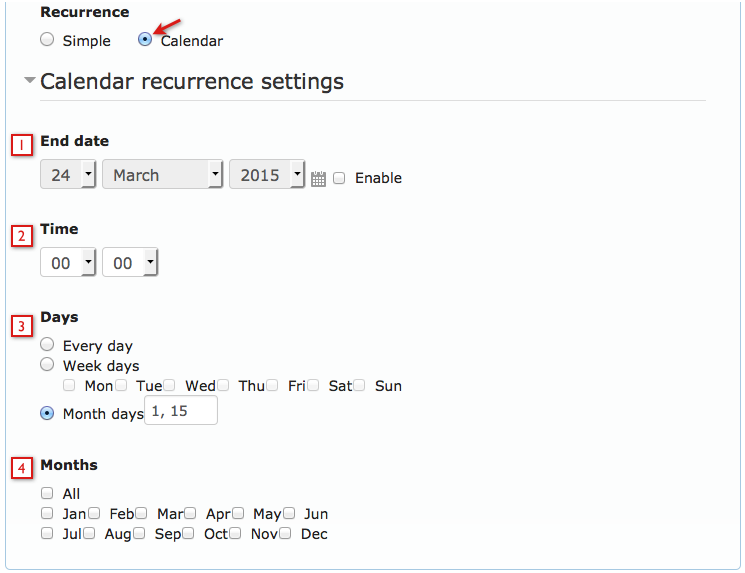
- End date: Select the date when the report should stop running. Select the Enable checkbox to enter an end date.
- Time: Use the drop downs to enter the time. The hours drop down uses a 24 hour format. For example, 16:55 is 04:55 PM.
- Days: select whether the report runs every day, only on specific week days, or specific month days.
- If week days is selected, select which days.
- If Month days is selected, enter a number for the day of the month the report should run. For example, 15 for the 15th.. If the report should run on more than one month day, enter day numbers separated by commas.
- Months: Select the months in which the report runs. For example, if the report is scheduled to run on January and July only, and the Month days is set to 15, then it runs on January 15 and July 15. If the report was set to run every Friday (in the Week Days) then it would run every Friday in July and January.
Note: If you need to have the import run at a specific time, RL Support can setup a custom serverside cron job to support that for Enterprise and Premiere support levels.
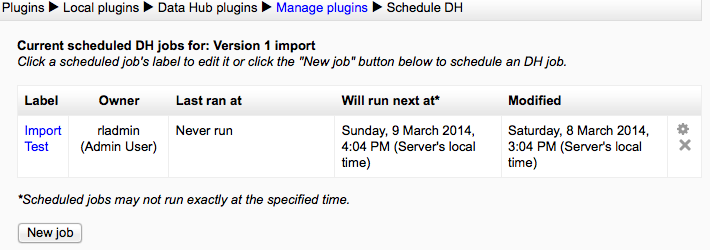
Once the schedule has been set, your job will begin running based on the time period. In the example above, the job was created at 8/March/2014 at 3:04 PM and is scheduled to run once a day. The import will run the first time on 9/March/2014 after 3:04 PM and every day after that until the job is deleted.
Finally, you can test your files by running them manually in Data Hub 2.
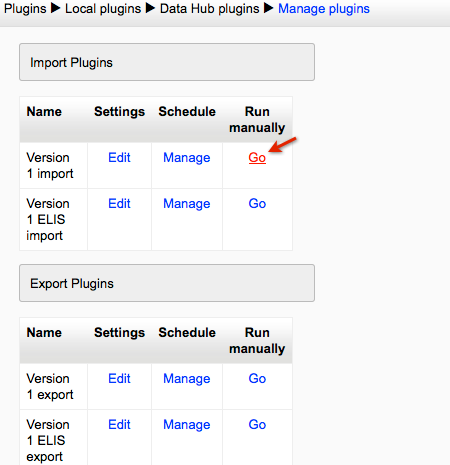
To run Data Hub manually, click the Go link under the Run Manually heading.
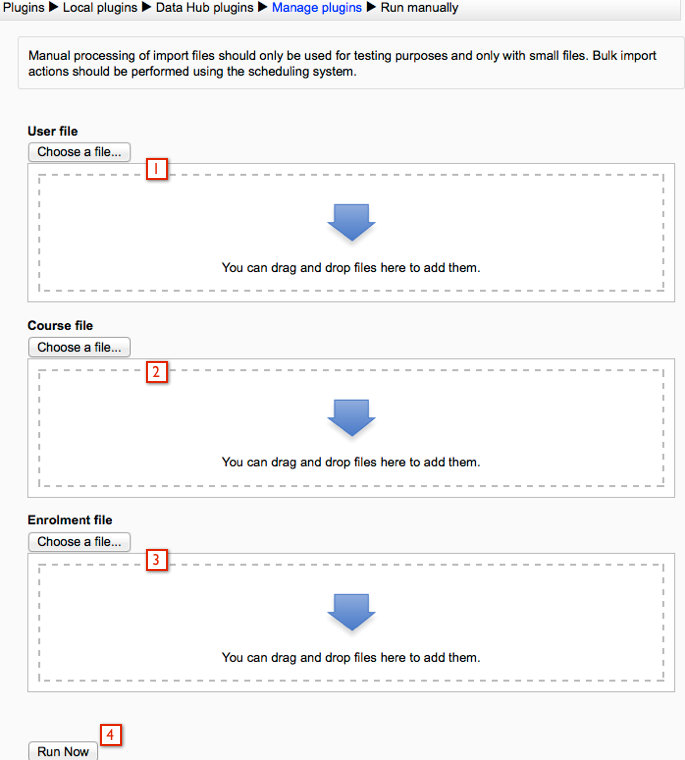
- Choose a file with user information in it to import manually.
- Choose a file with course information in it to import manually.
- Choose a file with enrollment information in it to import manually.
- Run now button.